Monday, August 17, 2015

Alabama Chanin Skirt The Process


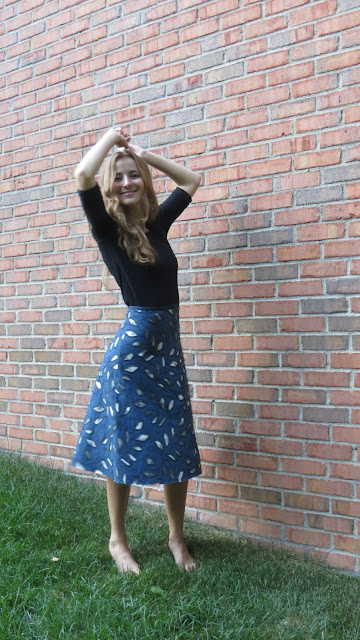
My daughter Jane gets to be the model for this skirt I finished from an Albama Chanin Kit.  http://alabamachanin.com/diy-bloomers-swing-skirt
I had seen this class on Craftsy and heard from sewers who really loved the process and results of working with Organic Cotton Jersey.  Being a novice at this type of sewing I decided on a kit, all precut and stencilled,  so all I had to do was hand sew.  Check out Featherstitch Avenue on my Favorite Blogs List to see further ideas.  A wonderful blog to follow with amazing pictures.   Here is a journal of my process.....


 I first looked at various scissors to work with.  I ended up using the black Dovo scissors (with the bead chain) to cut out the applicae, the curved tipped scissors ( to start the applicae, to the left), and the Geiger 5" tailor scissors for everything else (bottom).


I next looked at various marking tools for this project.

My underlining panel in muted.

The flip side, or outer layer of my skirt.  Lots of stitching around the shapes.


This picture show a skirt panel before the shapes are cut out (on the left) and two skirt panels with the shapes cut out.


After stitching around all of my shapes I settled on this chalkoner and small plastic ruler to cut out the applicae shapes.


I made a rough line with the chalkoner inside my applicae shape.


 I then very carefully made a snip on the chalkoner line with my curved scissors.  Pretty certain they are Geigers.


 I then used my blunted tipped Dovo scissors to cut out the applicae.


My panels all finished.


 I hand stitched my panels together.


 Then hand stitched the Fronts and the Backs.

This is just a brief review of my project but I would seriously purchase Alabama Chanin's Craftsy class (craftsy.com) or better yet attend a class with her.  I have gone back to look over her video for various techniques and ideas through the entire process.


Thursday, August 13, 2015

Wednesday, April 29, 2015

English Paper Piecing Hexie Flowers


There is something about Spring, Babies, Color and Family that touches me.  I came across Jodi's blog www.talesofcloth.com and her 550 flowers for a special friend of hers in need of a little comfort.  If you would like a reason to smile go to her blog and see this magnificent quilt she put together!  

Monday, April 6, 2015

Covered Snaps

Here is a quick tutorial on how to cover snaps.  Here are the materials I used.  Scraps from my fashion fabric silk lining, waxed thread, and snaps.

 My snap separated.
I cut a rough circle shape around each snap, giving some allowance.
 I hand sewed a small running stitch around the lining edge with the snap placed face down.
Pulled up the thread, not to tight.
 Snap the uncovered snap to the covered snap.  This gives you the desired looseness necessary to close the snap.
 Unsnap the snap and see the ease, without this the snap will not close.  Trust me on this one.
Do a running stitch around the snap mate. 
Pull up the running stitch.
 I stab a needle down through the center of this snap.

 Working the middle through the fabric.  Otherwise, the snap will not close.
Hopefully, this picture shows how I sewed the snap on.  I centered the snap behind the button for added support.
 Without this snap my pocket would droop.  Being that it is a decent size I thought it would be more aesthetically pleasing with the snap.
You can see a little with me wearing the jacket that the pockets stay put.  Yes, I love to wear jeans with my jacket as well!


Pockets


Once my jacket is constructed I then add all the embellishments and pocket variations.

.  I ended up with just two pockets, with the trim at my waistline.  I liked the way it proportioned the jacket on me.
I used this Clover measuring guide to give me my rounded bottom edges.
Here is my thread traced pocket shape through the fashion fabric and silk organza on the back.
 View of the silk organza side.
I then placed my lining over the silk organza side of my pocket.
 Pinned my pocket center line.
 Using white chalk drew a center line.
 Walking foot on my machine and tension dialed up I machine stitched down the white marked center line of my pocket, leaving an inch at the top and the bottom of the pocket.

 You can see here that I am able to pull my threads through and tie them off with the inch allowance.
I then measured from the center parallel lines about an inch apart, leaving an inch allowance on the sides.
I continued to machine quilt my fashion fabric, silk organza, and lining together.
You have to tie off all of those threads between the silk organza and lining.
You just fold your fashion fabric to the desired pocket shape and pin down your lining.  I start with the top edge.
 Then work on the bottom edge, lightly pressing down the lining first.
 Carefully shape the corners.
 My layout of my trims and embellishments used.
Added my fringe first by basting it down in the matching garment thread.
Then added my cream trim, hand stitching down.
I next added my blue trim, centered over the cream trim.  This shows the back side and how it sits inside the pocket.  I then slip stitched my lining around the pocket shape.  I also at this stage added covered snaps to my pocket.
Carefully placed the pockets onto my jacket and hand stitched them on.  I did add the buttons for an added embellishment.