Friday, February 26, 2016

The Happiness Project Chapter Two


Following through with "The Happiness Project" which is about marriage.  A great chapter on insights into marriage.  Whether one is married or not there are some quotes that I think are great.  One of my favorites " You can't change anyone else you can only work on yourself."

Saturday, February 13, 2016

Sewing Room Redo

Full Disclosure.  "The Happiness Project" goal was to organize my sewing room.  Now, I have to admit that I started to do what I do each New Year.  I would move things around, with the result that all that I had moved ended up right back in their original position.  I wish I took a before picture but I decided to blog about this after I started into this process.  Now I was a little hesitant to show just how messy this room was but nothing ventured nothing gained!  


This drafting table I got at IKEA many years ago.  The problem is I gathered so much clutter that in order to cut anything on this table I had to either take everything off the table or being a bit lazy just move items to one side.  Not very efficient.


Sorry for the glare!  I cleared off the drafting table surface making a more efficient work space.  I also cleaned up all the hidden clutter underneath the table, giving more leg space.  


I love pictures, quotes and flowers in moderation for inspiration!  The cutting mat I use is Martelli's which I love. Off to the right is a circular cutting mat which is very handy cutting small shapes.  


This is where I sit, sew and press.  Yes, again lots of clutter and the ironing board cover to the right needed sprucing up.


I removed all items from this table but my sewing machine,  keeping in mind my goal of not just moving clutter around.  


At this point it just made sense to clean my sewing machine.


I put only those items that I find essential when I am sewing.  Think in terms of the items you just want to reach for while sewing an item, as opposed to getting up and finding usual items.  


This little Sew Steady Assessory container holds a few must haves for my use. 


I took my Ironing Board Cover off to clean.  


I put three layers of wool blanketing on my Ironing Board for padding.


I used the best trio of products that I know of to soak and clean this Ironing Board Cover.  


Not the best photo but all clean and pristine.  Note the location of my pressing cloth's and pressing tools for easy access.


Cleaned up this bulletin board and have a favourite quote from Mother Teresa.  Another inspiration!


Favourite pressing tools, including products from Stitch Nerd.  I just find it easier to have them right there so again I don't have to get up when I am pressing.


I hung up my three favourite pressing cloth's, made out of respectively silk organza, muslin, and flour cloth.  Now, I found the flour cloth in a remote country store and I believe it was suppose to be used for rolling out dough but I use it here for certain pressing.  


This storage chest area before.


Cleaned up.  I moved the movable storage container to the left and put in drafting and a few measuring tools.  Again, those items I use when at my drafting table and don't want to get up.  The storage chest is organized and I have favourite items of inspiration and music.  Sometimes I listen to books on tape while sewing. 


Dress form went downstairs as well as the rolls of fabric.


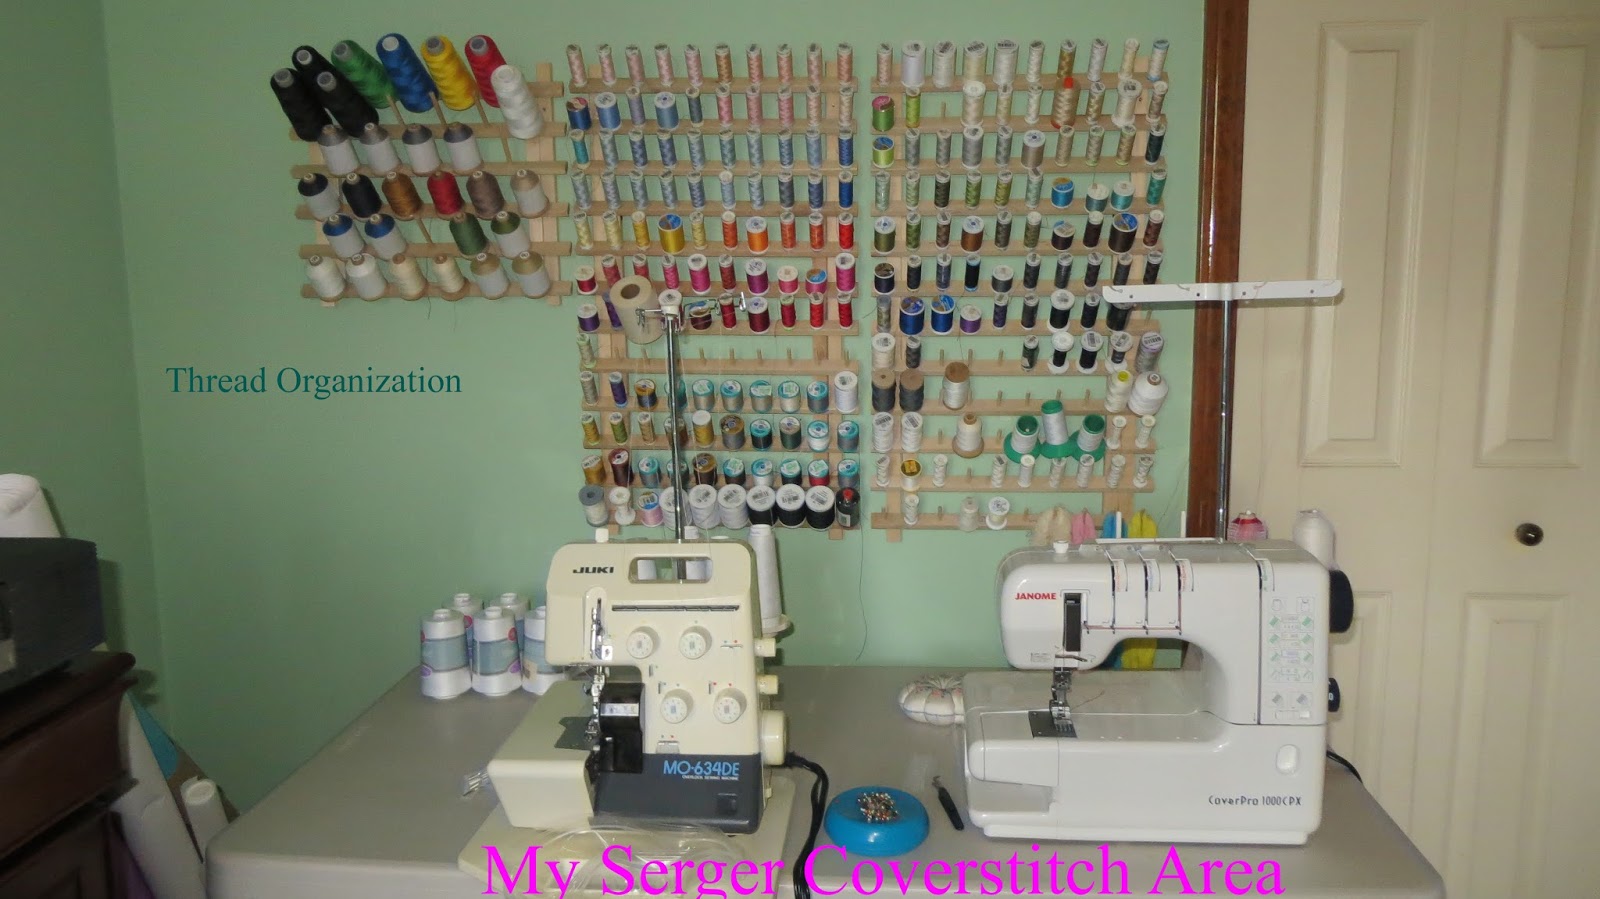
I actually placed my Serger and Coverstitch machines in this area.  This way I have all my machines in my Sewing Room.   Spools of threads a bit more organized.


Another angle of sewing area.


Walking into my newly organized, clean sewing room from right to left!


Various drafting tools.


Tuesday, January 5, 2016

The Happiness Project Chapter One


I happened to be around some young people who mentioned this book.  I loved their enthusiasm as they explained how they were not only excited about following the suggestions in the book but seeing the changes in their lives.  Isn't that what New Year's resolutions are all about after all?  So I am going to post things that bring me happiness through out this year.

A little prettier to look at here.  My goals for January will focus on exercise, de-cluttering and attitude.  My sewing area will be first on my list and hopefully bright and organized by next weeks post.  We shall see...  I do recommend the book though as it goes through the authors life and the changes she decides to make.  I have no affiliation with the author just something fun I wanted to share.  Part of happiness is passing along those things that bring you joy.  


Monday, August 17, 2015

Alabama Chanin Skirt The Process


My daughter Jane gets to be the model for this skirt I finished from an Albama Chanin Kit.  http://alabamachanin.com/diy-bloomers-swing-skirt
I had seen this class on Craftsy and heard from sewers who really loved the process and results of working with Organic Cotton Jersey.  Being a novice at this type of sewing I decided on a kit, all precut and stencilled,  so all I had to do was hand sew.  Check out Featherstitch Avenue on my Favorite Blogs List to see further ideas.  A wonderful blog to follow with amazing pictures.   Here is a journal of my process.....


 I first looked at various scissors to work with.  I ended up using the black Dovo scissors (with the bead chain) to cut out the applicae, the curved tipped scissors ( to start the applicae, to the left), and the Geiger 5" tailor scissors for everything else (bottom).


I next looked at various marking tools for this project.

My underlining panel in muted.

The flip side, or outer layer of my skirt.  Lots of stitching around the shapes.


This picture show a skirt panel before the shapes are cut out (on the left) and two skirt panels with the shapes cut out.


After stitching around all of my shapes I settled on this chalkoner and small plastic ruler to cut out the applicae shapes.


I made a rough line with the chalkoner inside my applicae shape.


 I then very carefully made a snip on the chalkoner line with my curved scissors.  Pretty certain they are Geigers.


 I then used my blunted tipped Dovo scissors to cut out the applicae.


My panels all finished.


 I hand stitched my panels together.


 Then hand stitched the Fronts and the Backs.

This is just a brief review of my project but I would seriously purchase Alabama Chanin's Craftsy class (craftsy.com) or better yet attend a class with her.  I have gone back to look over her video for various techniques and ideas through the entire process.


Thursday, August 13, 2015

Wednesday, April 29, 2015

English Paper Piecing Hexie Flowers


There is something about Spring, Babies, Color and Family that touches me.  I came across Jodi's blog www.talesofcloth.com and her 550 flowers for a special friend of hers in need of a little comfort.  If you would like a reason to smile go to her blog and see this magnificent quilt she put together!  

Monday, April 6, 2015

Covered Snaps

Here is a quick tutorial on how to cover snaps.  Here are the materials I used.  Scraps from my fashion fabric silk lining, waxed thread, and snaps.

 My snap separated.
I cut a rough circle shape around each snap, giving some allowance.
 I hand sewed a small running stitch around the lining edge with the snap placed face down.
Pulled up the thread, not to tight.
 Snap the uncovered snap to the covered snap.  This gives you the desired looseness necessary to close the snap.
 Unsnap the snap and see the ease, without this the snap will not close.  Trust me on this one.
Do a running stitch around the snap mate. 
Pull up the running stitch.
 I stab a needle down through the center of this snap.

 Working the middle through the fabric.  Otherwise, the snap will not close.
Hopefully, this picture shows how I sewed the snap on.  I centered the snap behind the button for added support.
 Without this snap my pocket would droop.  Being that it is a decent size I thought it would be more aesthetically pleasing with the snap.
You can see a little with me wearing the jacket that the pockets stay put.  Yes, I love to wear jeans with my jacket as well!