Monday, March 16, 2015

Fringe

I wanted to put fringe on this jacket as the fabric has a flat appearance, but struggled with exactly how to get the look I wanted.  After a fruitless search of fringe trims on the market I decided to make my own. 


I cut strips on silk organza on the true bias, which is at a 45 degree angle.  I used the two inch width of my ruler.  You may wonder why I did not cut the organza on the straight of grain, tried that and found it difficult to work with.  The bias allows you to place the fringe more accurately and to negotiate corners.  Trust me, it makes a big difference. 


I then cut bias strips of my fashion fabric on the true 45 degree bias.  My strips were longer then the above example, but some were relatively short depending on how much fabric I had to work with.


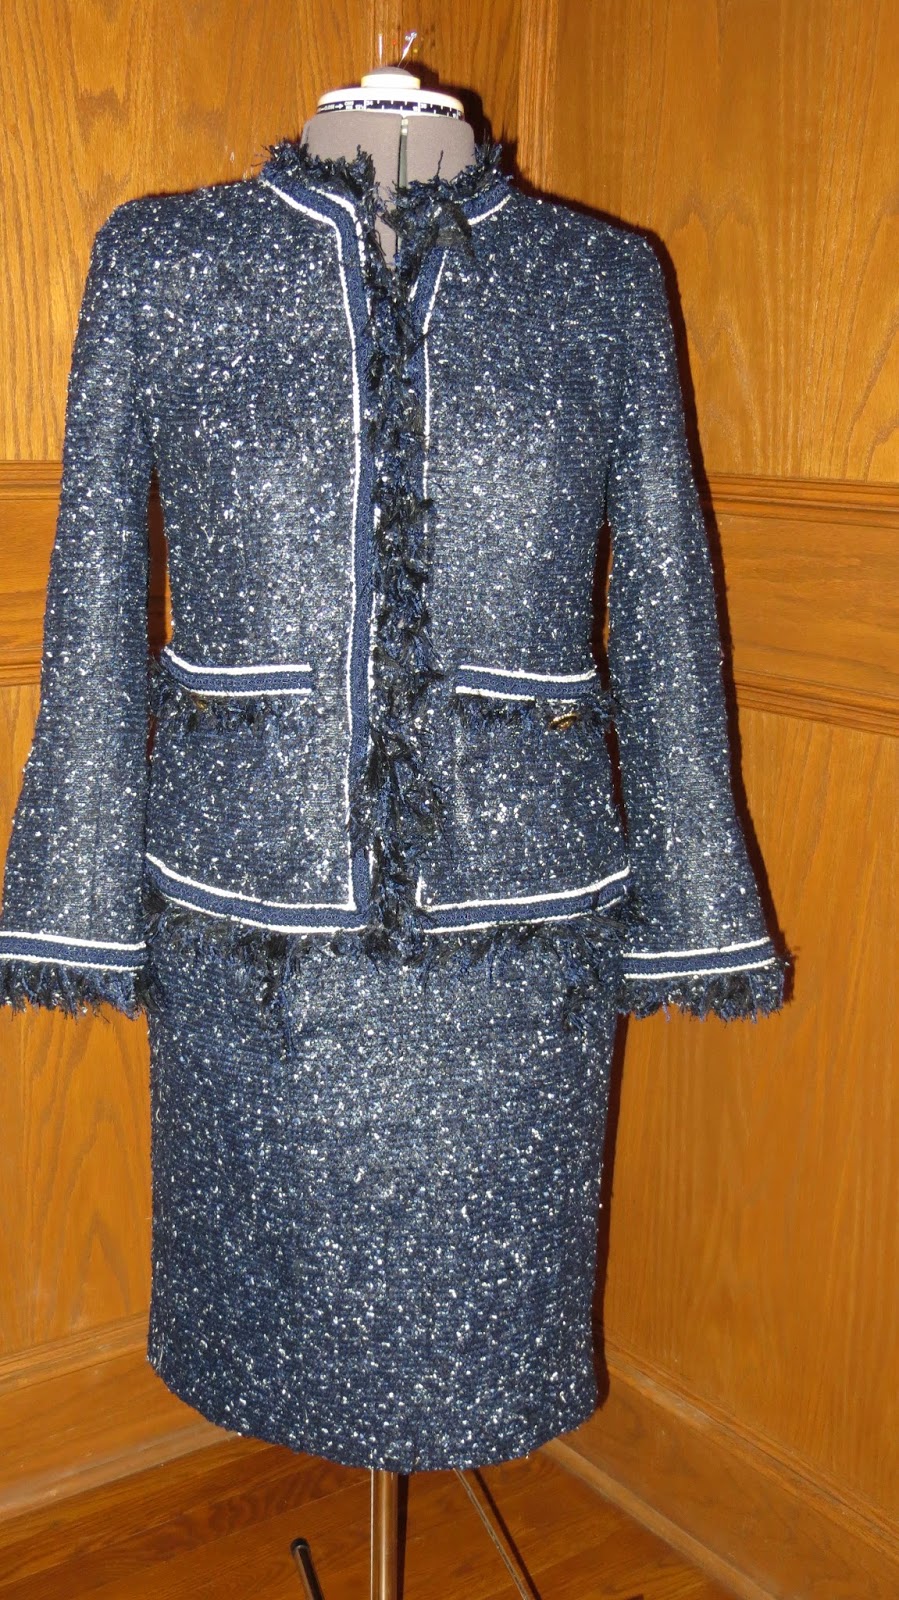
Case in point.  This is the fabric I ended up with at the end of my jacket and skirt.


Here are the two pieces you should have at this point. 


This is a very important step.  You need to flip your fashion fabric so the wrong side is facing up.  With the organza it doesn't matter which side is up as both are pretty much the same, at least on mine.  


Stack the fashion fabric on top of the organza creating a sandwich effect.


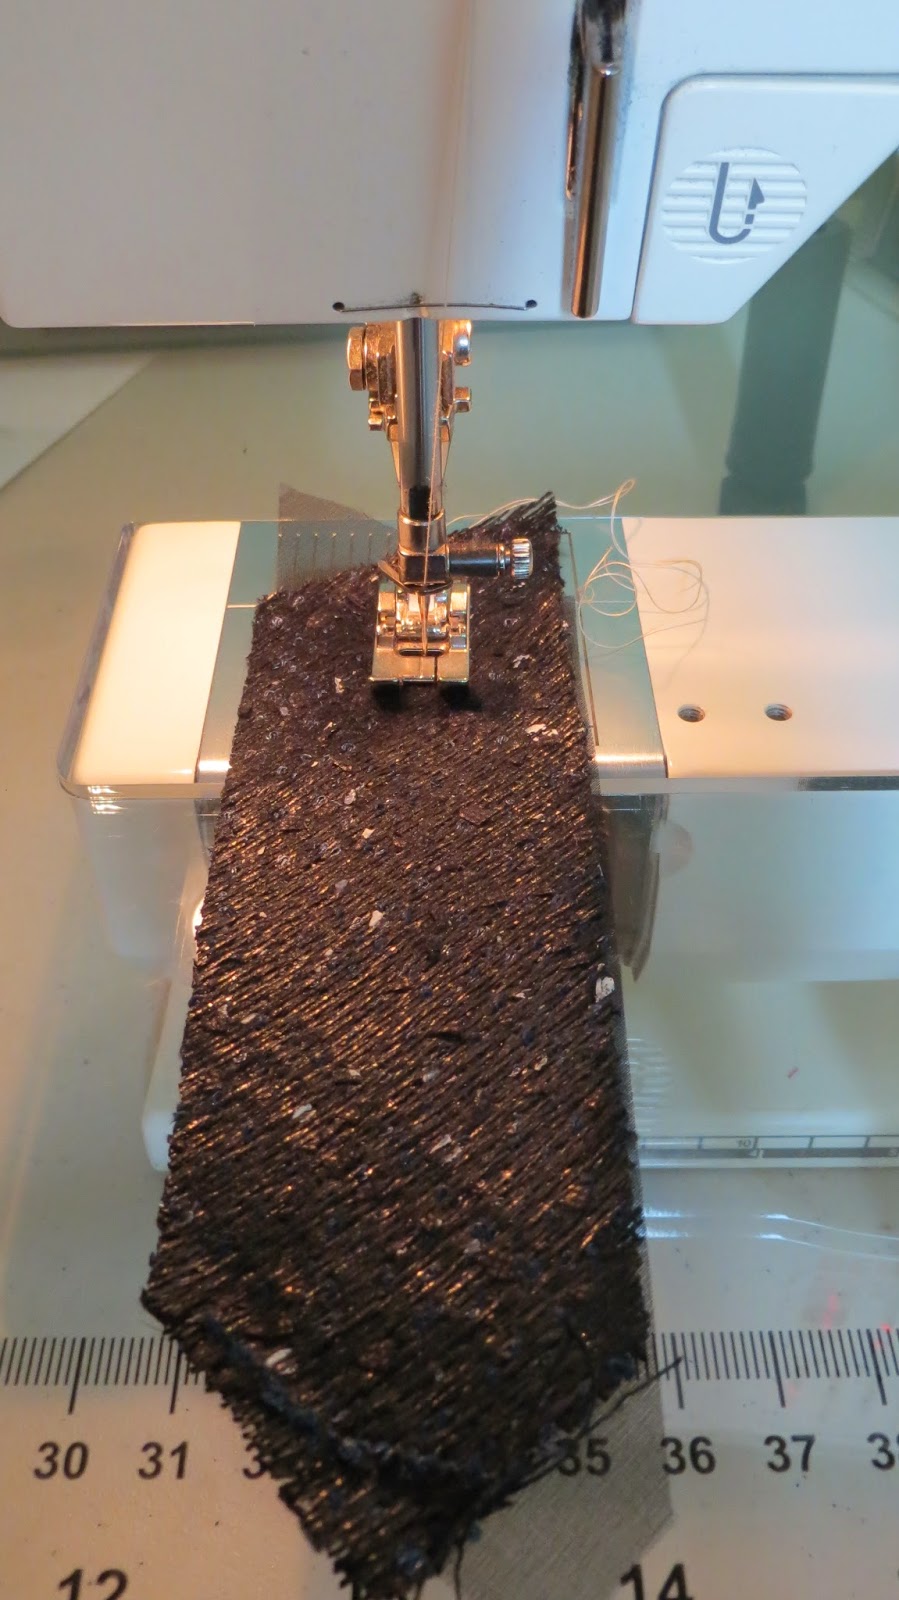
Next, machine stitch down the center of your sandwich, organza on the bottom fashion fabric on top.  I used a standard stitch length of 2.5.


Here is your sandwich with the organza side facing you.  I used light thread in my example but you would use matching thread at home.


I ironed my organza to one side, and my fashion fabric to the other side.  Do you see now why you had to put the fashion fabric face down.  If not it would not have looked right, trust me.  I do not show it but I used a piece of organza to press my fashion fabric as I think there is lurex in this fabric.  You have at this stage two layers of the fashion fabric and two layers of the silk organza.


I then stitched a zig zag stitch catching the organza-zig then the fashion fabric-zag.  This helps keep the fringe stable.  Again, I used matching thread on my garment.  The white above is just for demonstration purposes.


To actually fringe I used scissors that had a dull point. 


I basically separated the fibers and combed them downward.


You have to angle the blade downward to get a good fringe.


I turned my fringe sandwich to the non fringed side and separated the fibers as on the orginal side wallha!  A healthy fringe.  I hope this demystifies making fringe.  I sometimes give it a comb through before I wear the suit, happy with the result though. 


Tuesday, March 10, 2015

My Journey of the Perfect French Jacket


Here is my journey in creating my versatile, fun French jacket?  First, I gathered various details and silhouettes.


 I came across a jacket with this pretty detail in the back.  Not only did I use this back vent, but it gives a little ease in the hip area.


Image 2 I loved this sleeve that Leisa at www.achallengingsew.com posted under "Tracey's French Jacket of Wonder." Check out Traceys blog at www.featherstitchavenue.com for more incredible creations and photography to die for! 


 I wanted my jacket to be versatile like this picture, being able to dress it up or throw over jeans.  Cute and youthful.   


I just about jumped out of my seat when watching "Million Dollar Americans" working on my jacket.  I swear this is the same fabric that I purchased from Mendel Goldbergs, NYC.  At least it looks very similar to me.  This was definitely a sign and more age appropriate for me.

Wednesday, March 4, 2015

Designs


You can always tell a fabric from Alice's!
Quote:  Me


Each of these designs were made with fabrics from Mendel Goldberg, NYC.  I made the Black and White Jacket and Dress at Susan Khalje's "The Classic French Jacket" and "The Couture Sewing" school.   I cannot say enough about both.  Susan's eye to fit and taste is the best I have ever come across.  Alice, the owner of Mendel Goldberg's, and her lovely daughter Alex taste in fabrics is exceptional.  All these women are very classy and patient.  I know!


I have to show these linings, again from Mendel Goldberg Fabrics.  Alice has the most beautiful silks I have ever seen.   I used just a touch of the silk in lining my skirt, as I put in two front zippers.  I will go over the blue suit and skirt next week.
Leisa, at "A Challenging Sew" also has many wonderful examples of fabrics and techniques from Mendel Goldberg. 


Here is the URL to Alice's:  http://www.mendelgoldbergfabrics.com
Here is the URL to Susan's:  http://www.susankhalje.com

Being fit by Susan is well worth the visit to Baltamore for one of her classes, but if you can not make that I would highly recommend Susan's "Classic French Jacket" coming out soon.  I am counting the days.... 


Sunday, March 1, 2015

The Couture School Day 5

I'm back!  Sleeves on this dress were pretty simple.


I had cut a bias band my finished width doubled (front and underside) plus seam allowances.  I cut my bias 4" wide on the true bias, 45 degree angle.

I basted the bottom of my bias strip to the bottom edge of my sleeve leaving a 1 1/2" join seam.

Joined the bias band carefully stitching it by hand, machine sew the band on the bottom of the sleeve and press up.

This band adds a nice weight to the sleeve.


The shoulder is actually a drop shoulder.  So basted the sleeve in and machine sew. 


For my hem I used this wide bias tape.  Found this at Joann's and pressed leaving one side with a fold.  I then pinned this strip to my hem line on the dress in the fold.  Machine stitch and press up my hem.  Because this dress skirt was pegged doing the hem this way allowed for a nice smooth surface.  The only draw back is I will never be able to change the hem length.  

My zipper was put in by hand.  Pick stitch starting on the top right side, down then up the left side.


Finally, the lining needs to have all the changes from the original garment.  I worked on the bodice first making certain it was smooth, then added the sleeves.  Put the skirt on and fell stitched the lining along the zipper.


Added this little kick pleat in the back.

Fini!